
Coding a Pomodoro Timer - Part 3
- Coding
- HTML
- CSS
- Javascript
July 19, 2023
It's time to implement the actual functionality of this timer
using Javascript. To begin, I'll create a new Javascript file
named timer.js. To connect it to my HTML document,
I'll add the script at the bottom of the body in the HTML
document with the line of code
<script src="/timer.js"></script>.
Inside the Javascript file, I'll define variables and an object to configure the visual aspects of the timer. This will involve specifying the total length of the timer's circular path and defining color transitions based on various threshold values.
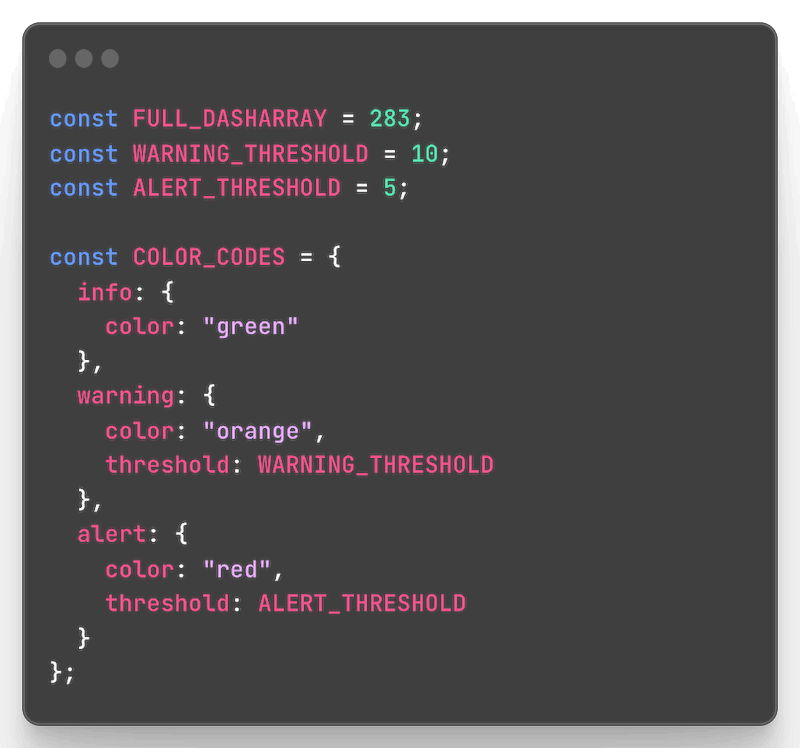
The variable const FULL_DASHARRAY = 283 represents
the total length of the timer circle path. It is used to set the
stroke-dasharray attribute of the remaining path, which
determines the visible and invisible parts of the path. The
const WARNING_THRESHOLD = 10 represents the
threshold value at which the timer progress color transitions
from "info" to "warning". It is used in the COLOR_CODES object
to define the threshold for the "warning" color. The third
variable const ALERT_THRESHOLD = 5 represents the
threshold value at which the timer progress color transitions
from "warning" to "alert".Finally the object
COLOR_CODES defines the color codes used for the
timer progress. It consists of three properties: "info",
"warning", and "alert". Each property contains an object with
the "color" property representing the color code for the
corresponding state. The "warning" and "alert" objects also
include a "threshold" property, which specifies the threshold
value for transitioning to the next color state.
Next I'll create variables to access my "start", "pause" and "reset" buttons. Additionally, I'll create a variable to access the element responsible for displaying the current state of the timer (whether it's in focus or paused):

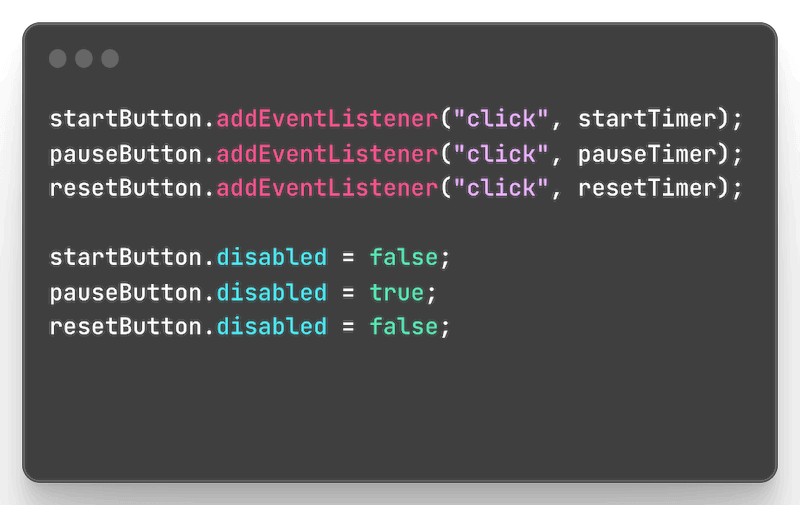
Afterwards, I'll attach an event listener to each of these buttons. This code essentially states that if a click event occurs on any of the buttons, a corresponding function should be executed. However, at this point, I still need to create those three functions. I'll also set the disabled state of the buttons. This will ensure that initially, only the "start" button is enabled, as there is nothing to pause or reset at the beginning:
Before I start creating the functions, I'll need to define a few variables. These variables will be used to keep track of the timer status, such as the time passed, time remaining, interval reference, remaining path color, and the total time limit. They will be updated and used in various parts of the code to control the timer behavior and visual display:

The timePassed variable keeps track of the amount
of time that has passed since the timer started. It starts at 0
and gets updated as the timer progresses. The
timeLeft variable represents the time remaining on
the timer. It is initialized to 0 and updated during the timer
countdown. The timeInterval variable stores the
reference to the interval function that updates the timer. It is
initially set to null and gets assigned the interval function
when the timer starts. The
remainingPathColor variable holds the color code
for the remaining path of the timer circle. It is initially set
to the "info" color, which is defined in the COLOR_CODES object.
The timeLimit variable represents the total time
limit or duration of the timer. It is initially set to 0 and
gets assigned the duration value when the timer starts. Finally,
the isTimerPaused variable represents if the timer
is paused or not.
Furthermore, I'll need to access the "plus" and "minus" buttons for adjusting the timer and pause duration settings, as well as updating the displayed time value when these buttons are used. To accomplish this, I'll create the following variables:
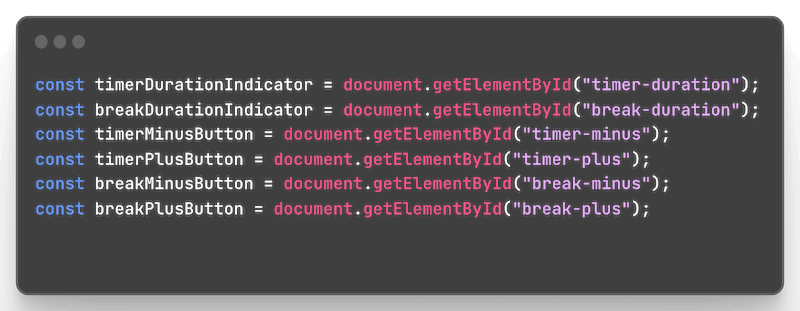
I'll also add event listeners to detect when the user clicks on these buttons. For each event listener, I'll assign a corresponding function to handle the button click event. However, I'll address the creation of these functions at a later stage.

The first function I'll write is the "startTimer" function. As the name suggests, this function will be executed when the timer is started. First, I'll have to retrieve the value of the timer duration from the "timerDurationIndicator" element in the HTML, convert it to an integer and multiply it by 60 to convert it to seconds. Then, I'll store the result in the "timeLimit" variable. Additionally, I'll add a function call for a function called "disableSettings" (which I haven't created yet). this will disable the settings once the timer has started, preventing the user from modifying the timer while it is running:

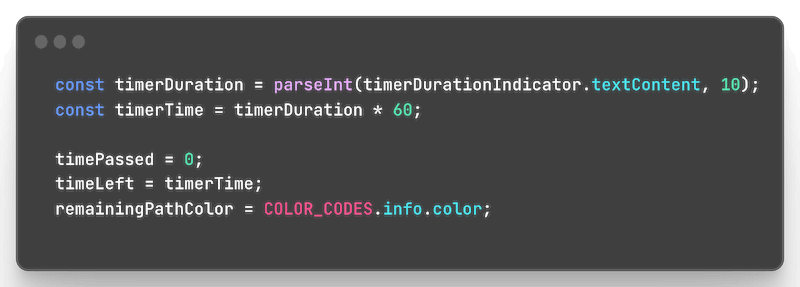
With the next lines of code I'll retrieve the value of the timer
duration from the "timerDurationIndicator" element, convert it
to an integer, and store it in the "timerDuration" variable.
Then, I'll create another variable called "timerTime" and assign
to it the "timerDuration" multiplied by 60 to convert it to
seconds. I also have to initialize the "timePassed", "timeLeft"
and "remainingPathColor" variables. I'll set
timePassed to 0, indicating that not time has
passed yet. The timeLeft variable is set to the
inital duration ("timerTime"). The
remainingPathColor variable is set to the initial
color defined in "COLOR_CODES.info.color":
The following lines of code will update the text content of the "base-timer-indicator" element with the formatted time left (stored in the "timeLeft" variable), utilizing the "formatTime" function (which still needs to be implemented). Additionally, the functions "setCircleDasharray" and "setRemainingPathColor" will be called to update the visual appearance of the timer circle based on the remaining time (these functions also need to be implemented):

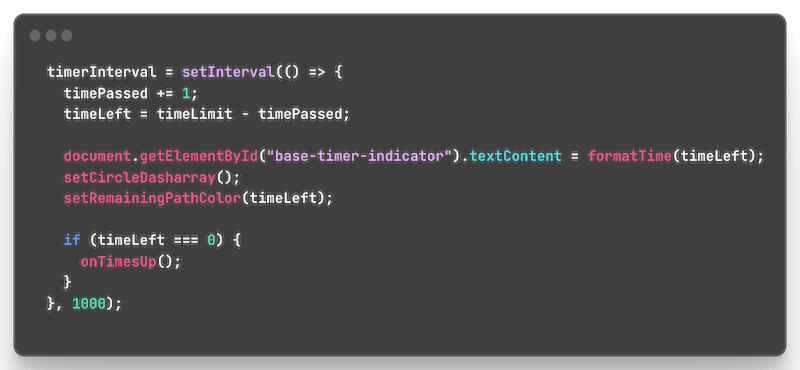
Next I'll configure a timer that runs every second. On each interval, it will update the time passed, calculate the remaining time, update the timer display, adjust the timer circle appearance of the timer circle, and check if the timer has reached 0 to trigger specific actions. When the timer reaches 0, it will call the function "onTimesUp" (which I still need to write):
Finally I'll disable the start button (to prevent multiple starts), enable the pause button, and enable the reset button:

For my next post, I'll be implementing all the missing functions and introducing additional functionalities. Stay tuned for Part 4...
